Using Sampled and Acoustic Drums

So I have previously posted pros and cons on using acoustic drums and on using sampled drums… now it’s time to mix it up. Using a mix of both acoustic drums and triggered (sampled) drums is one of my favorite ways to produce drum tracks. Here are a couple things to consider…

One of the most common complaints about using triggered drums is the cymbal sound. If you don’t play drums, then you may not understand… but there is a lot of feel that goes into a good drummers cymbal work. Cymbals are really more of an art form than most other percussive instruments. That is why I typically like to record acoustic… “real” cymbals along with triggered drums. It is almost impossible to recreate the nuances of a hihat or ride cymbal. Sample libraries sound great, they really do… but cymbals are best served with the full artistic expression of the musician.

On the other hand; Most of the time the drums (kick, snare, toms) are far less expressive. This will really be determined by the player, music, and genre. However, for the most part these drums are typically squashed with compression to give the track consistent dynamics. This makes these kinds of drums great for triggering. Triggering your drum tracks will give you the control over consistency that is typically desired. Additionally, you can utilize a great selection of drum libraries for your drum tones.

There are, however, a couple things to keep in mind while mixing your acoustic and triggered drums. One thing to consider is the drum room you are tracking in. If you are using microphones for your cymbals then you will need to consider the room you are tracking in. Room sound and having the appropriate space is paramount in getting great cymbal recordings. If this is the route you are considering; then you will need to have some great microphones, in phase, with preamps and converters, in a room that sounds great… that may be a tall order to fill.

Additionally, consider how you plan on capturing the triggered drum sounds. Most drummers are not too excited about how bouncy mess pads are, and hard drum pads will bleed into your overhead mics. Although this presents a bit of a problem… it can be easier to overcome these issues than properly setting up microphones, purchasing preamps and converters, checking phase, getting drum tone, and all the other hassle that goes along with recording acoustic drums.

In the end, mixing acoustic drums and triggered drums has always been my favorite way to produce drum tracks. All the issues brought up in this post can be hashed out with a conversation with your musicians before they get to the session. The most important thing is to make sure you musician is comfortable enough to give you a great performance. Even the best engineering can’t make up for an uncomfortable performance from a struggling musician.  

Pros & Cons of tracking sampled drums

Let’s start off with just saying; there are some real amazing drum libraries out there now! I do remember trying to use electronic drums, back in the 80s, to record my drum parts at home… and wow has this technology come a long way. There are some really great advantages electronic drums have, but there are also some drawbacks that need to be considered. Let’s take a brief look at some pros & cons of tracking sampled drums.

If you are looking for realistic sounding natural drums; one of my favorite programs is Superior Drummer from ToonTrack. As an engineer; I love the flexibility they give. As a drummer; I love the awesome selection of great sounding drums that are available. However, as with most sampled libraries, there are some drawbacks. One commonly forgotten drawback to using most sample libraries is called “Repetition Suppression”. This is a studied condition, that exists for all animals, where the neurons in the brain will actually stop firing as the brain detects repetition… in other words; our brains are wired to ignore repetition. I have talked about this before, with noise filtering, and now I bring it up with using sampled drums… in particular drum loops. Repetitive drum hits and especially loops can fall victim to repetition suppression.

One of the best ways to avoid this from happening to your drum tracks is also one of the coolest parts of using drum samples. Many times when drum samples are used, they are triggered from MIDI signals. If this is how you are using your drum samples; then time to get dynamic. Although you may not have control over using multiple samples for each drum, you may have control over making changes in the velocities of each hit. Going into your MIDI performance and changing the velocities of the drums is a great way to humanize your sampled drum sounds and to avoid repetition suppression.

Now that you have taken an even drum track, with all the same velocities, and totally messed it up… it is time to bring it back to a usable state. Send those drum hits, with the varied velocities, into your compressors. You may even want to set up a sidechain compressor and keep some of the original tone. As your velocities change your compressor will react differently while evening out the performance (depending on your ratio setting). Now you have variations with your sample library.

There are some sample libraries that utilize several sample of the same drums. These are great because they help to avoid this entire issue. However, if you are stuck with one sample per drum… then try out this trick. It will bring new life into your sampled tracks.

Pros & Cons of tracking acoustic drums

Tracking acoustic drums can be great… or not. There is a lot that goes into tracking acoustic drums. First let’s look at the room acoustics. Most likely the majority of your acoustic drum sound will come from the sound of the room. Even with close mic techniques, the room sound is an important part of the overall sound. Although the 70s popularized the idea that you need to have a BIG drum room, this is not really true. Great drum sounds can be captured in any size room. Really the important thing to keep in mind is, what genre and drum sound do you want to get. Having an idea of what sound you want to get first, will help you get the result you want. Pay attention to the frequencies of the room; is the room bright, does it sound boxy, is there a lot of low end? Usually you can tell these things by just having a conversation in the room while walking around and paying attention.

The other important aspect of room acoustics (probably most important) is to make sure you are not getting unwanted noise from outside coming in. You will most likely end up using overhead mics or room mics… that means any airplane noise, traffic noise, HVAC noise or other unwanted noise will be captured as part of the room sound. Make sure to pay close attention to this.

Now that you have the proper room acoustics, it is time to decide what instruments are needed. Most of the time this is simply determined by what drum set the band has. However, with acoustic kits, and the use of rentals, you can put together a kit with any components to get the sounds you want. Maybe you’re looking for a big TAMA kick drum sound with vintage Ludwig toms, or your choosing between a piccolo snare and a deep snare. It is easy to mix and match drum pieces with acoustic kits. Likewise, your percussionist can put together their kit in a way that is most comfortable for them… this is probably the biggest benefit of using acoustic drums.

Now time for microphones, preamps, and outboard gear… yes this is where it gets tricky. Choosing the correct microphones means you may need a lot of time and expensive equipment on your hands. Remember, anytime you have more than one microphone on a single source you will need to check phase. Also lining up your signal chain with complimentary  microphone, preamps, and outboard gear can take a while and become an expensive endeavor. However, when you get it right… the results are out of this world!

All in all, tracking acoustic drums is tricky, but can give you great results. Room acoustics, instrument choice, and good equipment selection will give you either great or disastrous results. If you have lots of time and lots of great equipment at your disposal, acoustic drums is the way to go… however, who has lots of time and equipment now-a-days…

Three methods for recording drums

Recording drums is one of the most important, and often tricky parts of any album. Unlike guitars or vocals, the room sound is often one of the key elements when tracking drums. This can make a good drum recording tricky… or even impossible, depending on your room situation. This month we will take a look at three methods for recording drums. Each have distinct benefits and drawbacks.


  1. Tracking acoustic drums. This involves setting up an acoustic drum set in a room and capturing it with microphones.
  2. Tracking sampled drums. This involves using an input device or already prepared midi beats to trigger samples of percussion sounds.
  3. Sample & acoustic mix. This involves using both samples and acoustic drums.

Vocal Room Noise Removal

It happens; sometimes you end up recording noise into your vocal parts. There are a lot of reasons why this may happen. Often times you will not even realize there are noisey vocal parts until you get into another room. Unfortunately, current vocal production is very fickle about these kinds of mistakes.

So let’s start off with why this can occur. It is very simple. The good and bad thing about how our brain works is that it adapts. Our brain is actually wired with what some call as “novelty detector neurons”. These neurons have been found to quickly stop firing if a sound is repeated. So, if you are sitting in the same control room everyday, and there is an HVAC noise in that room… your brain is most likely not detecting it anymore. Infact even if you’re working in the same room for a short period of time, your brain will start to ignore the surrounding sounds. That is where noise removal comes in.

The most basic process of noise removal is to put a gate on the vocal part. This does a great job of eliminating all noise that is below a threshold. There are also often settings where you can also adjust the amount of attenuation. For me personally, I like to have a little bit of life in my vocal tracks. So I’m often not completely attenuating below the threshold, but I will frequently leave a little bit of life sneak past the gate.

Gates can work very well when the noise is either covered up by the vocalist, or not present when there is singing. However, there are times when you want to catch some of the breath from the singer, or when there are quiet parts that have some room noise in them. That is when you need to analyze and remove room noise. This is a similar process to using a gate, but it utilizes frequency bands. The first step is to make sure you have a good sample of the noise that needs to be eliminated. Then analyze that noise and start to adjust your threshold. What happens is the frequencies that match what was analyzed start to get eliminated. So, you are essentially eliminating the noise that was analyzed… however, there is a catch.

Remember that you are technically not removing a noise, but you are removing frequencies… that’s right… some of those frequencies are also associated with the audio you are going to want to keep. Just like with many audio techniques, it may be best to have a light touch with multiple stages instead of one heavy handed approach. The best thing to do is to make a little adjustment and listen. If you are getting what you want, then keep going; if you are getting artifacts, then it is time to split the work between a couple different processes.  

Duplicate Vocal Harmony Parts

Layered vocal harmony parts are some of the coolest, and sometimes difficult, parts of audio production. Although an experienced singer will often come up with their own vocal harmony parts… sometimes it is up to the producer to create harmony parts. Here are some considerations to creating that harmony line.

The first thing that needs to be considered is… what is the expectation. When I was first getting started with vocal harmonizing I was right out of music theory class, and everything had to be perfect 4 part harmony… Then I realized sometimes Pop Punk songs don’t need 4 part harmony;) I is great to know how to make vocoder sounding tracks, 3-4 part harmony tracks, and all kinds of other cool tricks… but the most important thing to know, is what the expectation is. From there, you can now get to work.

Many times the first reaction is to put a plugin on the main vocal line, change the pitch by an interval, and call it a day. Although there are some styles of music where this works… it really doesn’t make for musical harmony parts. With the idea that most of the time we are working to create singable harmony parts, it is important to create harmony lines that are… singable. There are many different programs that will allow you to write in melody lines. I personally have been using Melodyne since around 2007 and I absolutely love it. Although I am not always creating perfect 3-4 part harmonies, I do see the importance of having contrary motion with harmony lines and avoiding parallel 5ths. These are some very usable music theory techniques. If you are writing in harmony parts from a single melody track, it may help you to think outside the parallel lines.

You may also want to consider how much you are harmonizing. You really don’t need every single word to be harmonized. In fact, the harmonies really loose their importance if they are over done. I typically try to find the parts of the song that need emphasis or a difference in vibe for my harmony parts. Again, if you just place a generic plugin that doubles the vocal line at an interval for the entire song… it’s going to get boring.

Finally, when you double the exact same audio part there are other issues besides just pitch. It is really important to pay attention to the phasing issues that happens when you have the exact same audio signal, twice. If you are not familiar with phasing issues with doubled signals, then you have some more to look up. However, to keep in the scope of this short post, it is important to make sure the harmonic structure of the harmonized parts are altered. Without changing the harmonic structure of the harmony the tracks may cancel each other out… this will start to make them sound smaller instead of bigger together.  

Lead Vocal Tuning1

Lead vocals is often considered to be the most important part of production. This is because, next to drums, the lead vocals is what people listen for and identify with. But what do you do when the vocal performance is sub-par… or a little out of tune? With current audio production, folks really expect to hear a tuned vocal that sounds amazing. If your production doesn’t meet these standards, then most people will not even finish their first listen.

When getting ready to tune vocals, the first consideration has to be about what is expected from the genre. A hard tuned vocal performance where you can hear artifacts would be completely out of place for a jazz performance… likewise, a lot of hiphop productions look for hard tuning. So the first consideration is to know what your client is looking for (client being either the artist for engineers or listener for self-producers). You can have the most amazing production… but if it doesn’t fit the genre… then you’re out of luck.  

“Hit the nail on the head”. I’ve done a lot of woodworking and that is always the advice my Grandpa gave me. I think this is great advice for vocal production too. Regardless of what genre you are producing for… hitting the target notes is priority #1. If there was a test to know if a vocal take should be redone… this would be it. There are other considerations, such as scoop and vibrato, to consider, but the median (or overall sound) of the note should be right on target.  

Now as simple as that seems… there is always a certain amount of grey area. There are some genres where the singer scoops into the note, or there is a lot of vibrato. Scooping the notes happens when the singer slides their notes into each other. Such as going from the A to the C# and back to the A in the above picture. This is where knowing your genre is key… This happens to come from a vocalist in the country genre, where we don’t want to “Hear” any vocal tuning. So for this vocal take we left the scoops in and really focused on just hitting the target notes. This can be tricky if you have little experience or a sub-par vocal tuning program, but it is an essential part of vocal production.  

The above image also ends with a nice sounding vibrato part. You can see the vibrato on the last A note that is sung. It is important to know if vibrato is something that should be kept in or squashed. I’ve worked with some singers who had too much vibrato and we took the vibrato out and I’ve worked with some singers who have no vibrato and we had to add some in. either way knowing the expectation is the most important part of tuning vocals… so make sure you know what your target is.

Welcome to Vocal Month!

Welcome to Vocal month. This month we are not only having a vocal promotion, but the blogs will also dive into some vocal production techniques. Vocals is often considered THE most important part of production, next to drums. Stay tuned, this month we will dive into; lead vocal tuning1, duplicate harmony parts, and vocal room noise removal.  

Clean it up!

This week’s blog post is all about cleaning up guitar tracks. Although this is not the most exciting topic… in today’s production/perfection crazy audio industry having extremely clean tracks is expected. There are lots of ways that you can clean up your tracks, and in this post I’m going to briefly go over a couple that I utilize.

fade-in
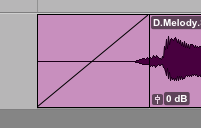
First, and possibly the most important, is making sure that all punch in and punch out points have fades. I always took for granted that audio tracks would be properly faded in and out when I started off. That is because I was always the one working on the tracks. However, not that I am receiving tracks online from clients… I’m realizing that some basic production necessities sometimes go overlooked. Fading in and out audio tracks at the beginning and end of their region is an absolute necessity, and here is why. When you have an audio signal that is cut (either at the beginning or end of a region) you are creating a spot where there is an audio “pop”. The only way to avoid this is to make sure the cut is at the absolute zero amplitude mark… just about impossible. I say this is just about impossible, because most DAWs don’t allow the precision for this to happen. Soooo… the way to avoid this kind of noise is to make a fade. The fade can be a short 2 millisecond edit fade or a long drawn out musical fade… either way there needs to be a fade at the ends of every audio region. Even if you don’t hear a pop right away… that doesn’t mean one won’t sneak in later during mixdown or export… and once they are there, there is no turning back.

metersThe other key noise removal techniques that I like to employ is using noise removal plugins to remove amp noise, ambient noise on acoustic tracks, or just about any unwanted noise. Nothing is more annoying than hearing a fantastic sounding song and at the end, as the guitar sustains and decays their last note, all of a sudden this obnoxious amp noise creeps in. That kind of production just doesn’t fly… however, sometimes you just need to use a noisy amp to get the tone you need. That is when I bring in the really cool plugins and do some noise analyzation and reduction. I have recorded acoustic guitar tracks that have had truck noise from the back alley in them and sometimes there is just too much hissing from an amp to ignore… but those noise issues need to be taken care of. I have found the typically the only way to get these noises out is to employ a plugin that will analyze noise and remove the analyzed parts. There are a handful of manufacturers out there that make products like this… and I highly recommend finding one that works for you

That is it for this week. Check back next week for another songwriting blog post.

Get Amp’d!

Last week we looked into how important instrument choice is. This week we are going to get into a topic that can go on and on and on and on… AMPS:) Oh, there is just sooo much to cover and this will be a topic for many more blog posts and videos. This blog post, however, will narrow the topics down to some of the recent amps that were used on some of the 2016 albums that have been released.

Image result for Fender Twin Reverb amp
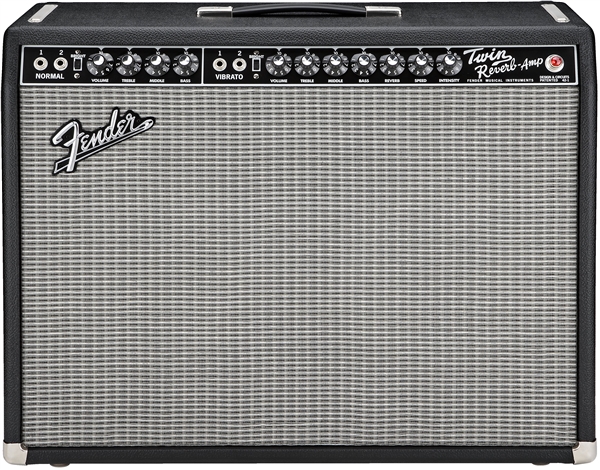
The first amp I’m going to take a quick look at is my ‘65 Fender Twin Reverb amp. The Fender Twin is known for being an extremely clean amp with lots of headroom. I have always found these amps to sound incredibly warm and have a really great low end. Because of this, I often find myself pulling out the Fender Twin as a rhythm guitar track. I paired the Fender Twin Reverb with my 1966 Rickenbacker 370-12 on all the tracks for Moment of Worship’s 2016 albums. I found the Fender Twin did an amazing job adding depth to the Rickenbacker. It also helped to darken the tone of the 370 so I could mix the track in a little hotter.

markiii-1
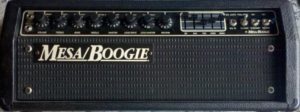
The next amp I’ll take a look at is the Mesa/Boogie Mark III. First let me say, I’m really a Mesa/Boogie fan… Just about all of their amps are A-Ok in my book;) The Mark III happens to be a very versatile amp. The sounds you can get out of it are extremely clean, to a little dirty, to a great lead or metal tone. I recently paired the Mesa/Boogie Mark III with my 1959 Fender Stratocaster to make stereo rhythm guitar tracks for Across the Stateline. Since there were lots of acoustic and clean tracks, I used the Mark III to dirty up the overall feel of the tracks.  

Image result for Ampeg SVT-4 Pro
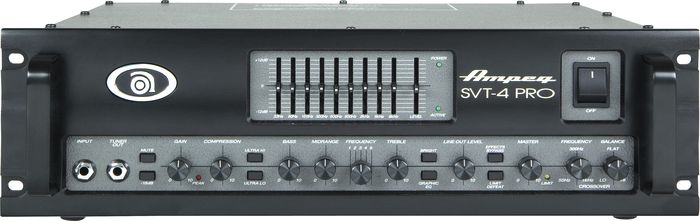
Finally, for this post, I’ll look at the Ampeg SVT-4 Pro that I used on the bass tracks for “Forged in Fire” by Killing Jabez. I’m not sure if it is the tube preamps, the massive amount of tone control, or what… but this amp really brought my 2004 Fender Deluxe Jazz bass to life on this track. I was looking around for an amp that would bring a nice rounded sound to the track. If you listen to the song, the bass is really what drives the entire composition… so the tone had to be just right and the Ampeb SVT-4 Pro really gave the song what it needed.

That is it for this short post on amps. Check back next week for another post on cleaning up noisy guitar tracks.